Xcode搭建Opencv3环境
1. 下载opencv
-
使用简单粗暴的方式——brew进行安装:
brew install opencv@3,注意这里通过brew下载的opencv3的地址为:/usr/local/Cellar/opencv@3/3.4.9_1(后面配置include和lib有用)。 -
这里存在很大的问题:brew除了下载opencv以外还需要下载opencv的依赖包(很多),这里强力推荐换brew的镜像源(本人用的清华的,当然也可以用中科大的)。具体配置方式如下:
-
第一步:替换brew.git:
cd "$(brew --repo)" git remote set-url origin https://mirrors.tuna.tsinghua.edu.cn/git/homebrew/brew.git -
第二步:替换 homebrew-core.git:
powershell
  cd "$(brew --repo)/Library/Taps/homebrew/homebrew-core"
  git remote set-url origin https://mirrors.tuna.tsinghua.edu.cn/git/homebrew/homebrew-core.git
-
2. 在Xcode上搭建opencv的环境
- 新建项目:macOS - Command Line Tool - 这里选择语言为C++
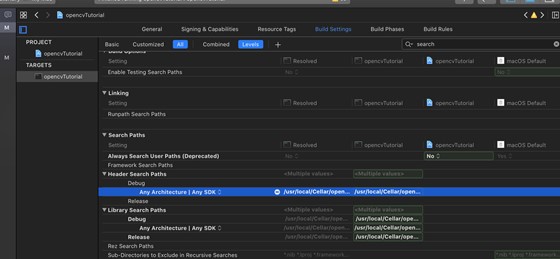
- 点击项目,选择Build Settings- 在搜索框中搜索search。
- 在头文件路径Header Search Paths中debug中添加一下
/usr/local/Cellar/opencv@3/3.4.9_1/include
/usr/local/Cellar/opencv@3/3.4.9_1/include/opencv
/usr/local/Cellar/opencv@3/3.4.9_1/include/opencv2

- 在Library Search Paths中添加
/usr/local/Cellar/opencv@3/3.4.9_1/lib
- 在项目中添加动态链接库文件:选择项目- 右键New Group - 新建一个名字(比如lib)- 右键lib - Add files to - 按下
/会直接提示到那个目录下找dylib,这里是/usr/local/Cellar/opencv@3/3.4.9_1/lib,把当前目录下的所有dylib都添加进去即可,如下图。

- 以上就是整个opencv3在Xcode的环境了。
3. 测试案例
#include <iostream>
#include <opencv2/opencv.hpp>
#include <opencv2/highgui/highgui.hpp>


using namespace std;
using namespace cv;

int main(int argc, const char * argv[]) {
    // insert code here...
    cout << "This is my first try C++ in xcode!\n";

    Mat img = imread("/Users/xcode_project/C++_project/opencvTutorial/test.jpeg");
    if (img.empty()){
        cout << "Could not open image ..."<< endl;
        return -1;
    }
    namedWindow("test",CV_WINDOW_AUTOSIZE);
    imshow("test", img);
    waitKey(0);


    return 0;
}
